Install macOS on VMware on Windows 10
Well, another WWDC, another surprise. Just like years past, this year Apple hasn’t fallen back. This year, Apple announced their latest version of macOS — macOS 10.14 Mojave (Specifically pronounced macOS Mo Harvey). Of course, there are a bunch of fresh features and stuff that most had called. During the keynote, Apple previewed some of the important features including a complete Dark Mode, Dynamic Desktop, Stacks, Gallery view for Finder, Group Facetime and there’s a lot to talk about. But if you’re a Windows user and thinking you’re out of this and that’s what only for Mac, change your mind because here’s how to install macOS Mojave on VMware without having or getting a Mac just for free.

Just because Apple doesn’t want us to install doesn’t mean it’s not possible. Thanks to virtualization apps like VMware which let us run entire system inside your Windows without actually buying one or rebooting every time you run, like Dual-booting. With VMware, the installation process is pretty straightforward. If you’re familiar with or have used before, there’s nothing much to worry about. Simply, download the Mojave Image and also download VMware and install it and you’re ready to go. This way, you can create a virtual machine (VM) and run Mojave once you have installed. With that, you can enjoy installing and exploring Mac apps like Xcode.


When installed, you’ll have the primary tools integrated with you such as the internet adapter, USB controller, drag & drop and more. Other than this, you might have lots of questions, they will be answered on the way to installation. In this article, I’ll walk you through how to install macOS Mojave on VMware in Windows PC. The process is pretty covered in steps with clear shots that you won’t be alone, let’s break it down. Here’s how to Install macOS Mojave on VMware on your Windows PC.

macOS Mojave
Is my PC Compatible with macOS Mojave?
Whenever Apple develops new software or updates, Apple restricts them to older Apple devices which are called incompatible devices. This has been from years for Macs and this time they did it as usual. But in case of installation on Windows PC there’s no sentence, means whether you’re using an old or new PC with any version and edition of Windows you have, you can download and install macOS Mojave on VMware on your Windows PC. After all, if you’ve questions out of this, you’ll be answered with the installation, if not, there’s a huge comment form for you.
What you’ll need
To begin, you’ll need some files including macOS Mojave virtual image. If you’ve downloaded macOS Mojave before for the Mojave installation on VirtualBox, there’s no need to download it again. If you haven’t, you should download these files, while you’ll need them in the process.
- VMware Workstation / VMware Player – VMware is the perfect virtualization program for virtualization. Though VMware doesn’t officially support macOS but actually if you do little tweaks, it will work with the essential tools such as Ethernet adapter, sound, full-screen resolution and more. Get VMware Workstation/Player officially from the website and install on your Windows if you don’t have already.
macOS Mojave Final Image (18A391) 24 September, 2018
- macOS Mojave Final APFS by Geekrar (One Full – Google Drive) — The macOS Mojave VMware Image is ready to download whenever you want. The file is completely accurate, secure and safely compressed into zip file, go ahead and download now.
- macOS Mojave Final APFS by Geekrar (6 of 6 – Google Drive) — For some reasons, if you wish to get the file in handy, you can do it so with a few clicks from here.
- macOS Mojave Final APFS by Geekrar (One Full – MediaFire) — Whether you’re unable to download or prefer to download from another server, in anyway we’ve got you there.
- macOS Mojave Final APFS by Geekrar (6 of 6 – MediaFire) — Alternatively, for whatever reason, if you favor downloading in parts, you’re nowhere far from it.
Latest preview: macOS Mojave 10.14.3 APFS (18D109) February 7, 2019
- macOS Mojave 10.14.3 APFS by Geekrar (One Full – Google Drive): Download Now
- macOS Mojave 10.14.3 APFS by Geekrar (7 of 7 – Google Drive): Download Now
- macOS Mojave 10.14.3 APFS by Geekrar (One Full – MediaFire): Download Now
- macOS Mojave 10.14.3 APFS by Geekrar (7 of 7 – MediaFire): Download Now
- Fix Download Limit — If you are having issue downloading the file, we’re always here to help, you can find the way to fix it.
- Fix VMware Device/Credential Guard & VirtualBox – Error — If you’ve encountered an issue that indicates this, here’s how to do a quick solve.
- Fix Authorization (HTTP 403) Error — If you’re unable to download the file due to authorization problem, we’ve covered with up with super-easy guide.
- WinRAR — 7-Zip — For extracting and unzipping the downloaded files, you’ll need to download and install the latest version of Winrar or 7 Zip.
- Unlocker — For patch relevant files to VMware, you’ll need them to install macOS Mojave.
With the image, the necessary tools are included that you won’t have to dig around for it and save time.
Also, you can check and download macOS Mojave Image for VMware & VirtualBox latest version here as well.
Anyway, when you’ve downloaded the files, extract them with Winrar or 7 – Zip to make them ready to use.
Before you start, you’ll need to look for a few settings in your computers BIOS. When you boot into your computer BIOS, watch out if you’ve enabled Virtualization options (VTx), if you haven’t, go ahead and enable it or you may be in trouble later. When you’re ready, go for it. Start Install macOS Mojave on VMware with the steps one by one.
Step One: Install VMware Workstation on Windows
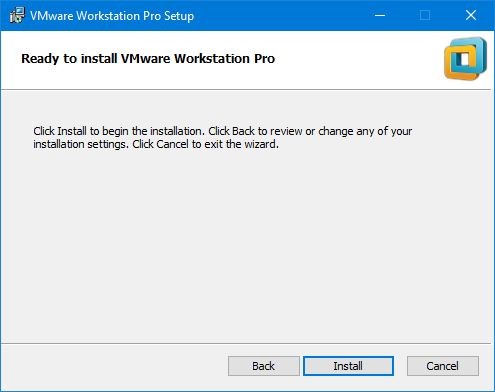
When you have downloaded VMware Workstation/Player, it’s time to install it. From the VMware files, click setup.exe to launch the installation wizard. Just as simple, proceed with some ordinary installation prompts and you’re good to go.
Install VMware Workstation / Player
When you’re done with the installation, click Finish on the wizard to close up. When installed, don’t launch it ( Seriously otherwise the next step won’t work).
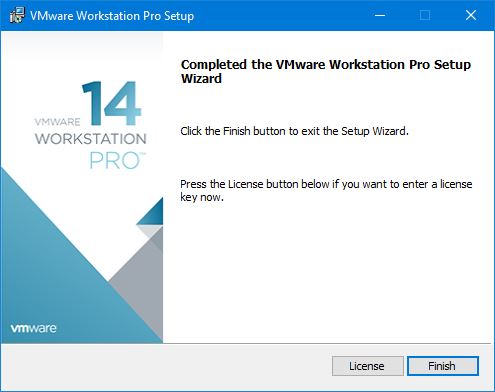
Finish
Step Two: Patch VMware Workstation
By default, there’s no option for macOS to choose for installation because as said before VMware doesn’t support macOS instead it’s restricted. In this case, the macOS Unlocker (unlocker for short) becomes useful. Unlocker tool (for short) has developed to remove the function lock macOS X (Server) easily and patch files to work macOS in VMware Workstation or Player. To use this, all you’ve to do is to close VMware if it’s open and run Unlocker here’s how to do it. Navigate to the Unlocker210 files if you’ve VMware Workstation 14 otherwise use Unlocker208 (both works the same, the difference is just with the VMware version) and right click on win-install and Run as administrator. It will simply run commands in command prompt to patch relevant files in VMware — That’s okay.

Unlocker 210 – Run win – install
Step Three: Create a New Virtual Machine
Now it’s time to do a little configuration, for that do go away from the steps.
Head to VMware Workstation or Player and open it. When you see the Home page, choose to Create a new virtual machine or simply press Ctrl + N.
Head to VMware Workstation or Player and open it. When you see the Home page, choose to Create a new virtual machine or simply press Ctrl + N.

VMware Workstation Pro – Create VM
On the wizard creation, select the Custom (advanced) option and click Next.

New Virtual Machine Wizard
Here you’ll see some sort of information on hardware compatibility and limitations for the virtual machine simply Next it.

VM Hardware Compatibility
Now select I will install the operating system later and click Next.

Guest OS Installation
For the operating system, choose Apple Mac OS from OS selection and for version select the latest version (10.14) if available, if not, select previous version (10.13) it will work too then click Next.

Select a Guest OS
Name the virtual machine whatever you would like to and specify the location where to store the virtual machine files, then Next.

Name the virtual machine
The processors are the significant part of a virtual machine, set up 50% – 75% of your system’s CPU.

Increase Processor
For memory, I’d like to set 4GB RAM for the virtual machine, that’s about 50% of my laptop memory. Ensure you set 50% – 65% of your system’s memory for the VM. Like I have 8GB of RAM in total, so I have used 4GB for the virtual machine.

Increase Memory for VM
By default, NAT will be selected, that’s okay, just Next.

Network Type
On this page, you don’t have to make any changes, simply click Next.

IO Controller
Continue through the process with Next.

Disk Type
In the disk selection, select Use an existing virtual hard disk and follow Next.

Choose existing
Next, browse the macOS Mojave Image (VMDK) you had downloaded then click Next.

Select an Existing Disk
At last, you’ll have the summary of the virtual machine creation, if you wish to make changes, customize hardware to change one, if everything seems ok, hit Finish.

Ready to create virtual machine
Step Four: Insert VMware Code in Virtual Machine file
When the virtual machine is configured, you’ve to tweak this to insert code into macOS VMX file.
At this point, navigate to macOS virtual machine files and open (macOS Mojave).vmx file with Notepad.
If you didn’t find Notepad to open there, click on Choose another app, scroll down to select Notepad.
At this point, navigate to macOS virtual machine files and open (macOS Mojave).vmx file with Notepad.
If you didn’t find Notepad to open there, click on Choose another app, scroll down to select Notepad.

Open VMX with Notepad
At this window, copy the code from below and paste it at the end then save it like the shot.
Smc.version = 0

Add Code
Step Five: Install macOS Mojave on VMware Workstation
And you’re done with configuration and you’re ready to actually install macOS Mojave on VMware.
Navigate to the VMware Workstation and start the virtual machine with Power on the virtual machine.
Navigate to the VMware Workstation and start the virtual machine with Power on the virtual machine.

Power on virtual machine
As it starts up, the Welcome screen will appear (It’ll take some time to boot depending on your configuration), select your place where you are located and Continue. If you encounter some sort of error which shows ” This virtual machine requires AVX2 but AVX is not present. This virtual machine cannot be powered on.” Here’s how to fix it in a moment.

Welcome
Next, select your keyboard, if it’s not there, click Show All to choose your keyboard from the list. When you’re done, click Continue.

Select Your Keyboard Layout
Apple wants you to use your personal information when asked by Apple feature. Also, Apple confirms to collect this information when needed to enable features.

Data & Privacy
Yes, you have the option to transfer information from your Windows PC, but that’s not the recommended one since you’re not going to use this as your primary computer, don’t do that. When selected, click Continue.

Transfer information to this Mac
Sign in with your Apple ID if you have one, if you’re a newbie, click on the Create new Apple ID to create one. Alternatively, you can sign in later anyway you want. Whatever you choose, Continue it when finished.
To make things work, the virtual machine is automatically connected to the internet as you configured.
To make things work, the virtual machine is automatically connected to the internet as you configured.

Sign In with your Apple ID
The Terms and Conditions provide information on the use of Mac computer, the macOS software, Game Center and other services if you want to read that’s okay if not, that’s not a problem.
To Agree to the Terms & Conditions, tap on Agree.
To Agree to the Terms & Conditions, tap on Agree.

Terms & Conditions
Apparently, you’ll need to create a local computer account, simply enter your details into the blanks and Continue.

Create a Computer Account
The express set up will enable the features, Maps – Location – Find my Mac and some more. In case, if you wish to customize and enable only those you want, you can do that, just hit Customize settings to allow the services you want.

Express setup
If you chose to customize settings, you’d be asked for every single service for enabling — At the first screen, you’ll be asked to enable location services, as here I don’t allow location services, simply Continue.

Enable location services
Similarly, you’ll be asked for some essential services, you can easily choose to enable or disable.
After you continue, you’ll witness of your favorite part you were definitely waiting for. I guess you’d probably want to try the new look — Dark Mode. Otherwise, you could change it later, just Continue.
After you continue, you’ll witness of your favorite part you were definitely waiting for. I guess you’d probably want to try the new look — Dark Mode. Otherwise, you could change it later, just Continue.

Choose your look
Yay! Eventually, you’ve done it — You’re into macOS Mojave. I know there’s much to dirty your hands with, but you don’t have to because there’s still more important to do.

Leave a Comment